Hello! Happy Snow Day! ...well week, where I am! It is not much compared to what the North is getting, but for our little area in the South, it is exciting! For three days now I have gotten to look outside and see the ground covered with snow! It's so pretty. Here I am the night it started to snow:
Being "snowed" in is great for scrapbooking. Here is a layout that I completed on my first snow day. I am using Memory Box Paper and House of Three Paper. Two of my favorite companies! I also made my flower using the new McGill Paper Blossoms tool! Let me tell you about this...WOW! It's like magic and so easy to use. You can now create custom flowers using papers that coordinate with your project!
I had a lot of fun creating this layout! What is so neat about the House of Three Paper that I used has a design embossed on it so that you can ink it, spray it, and it will resist. Fabulous paper! I used paper from Memory Box's new Valentine Delights line... (I love this company and I love their stamps. I used their new stamp Adore Peony Collage on this layout too! ) The background paper is Memory Box and then I used papers from the 6x6 paper pack they have for this line on other parts of the layout.
Here is the tag that I made to use as an embellishment. Tags are real big right now, but sometimes it can be tricky to use them once created, but they make great embellishments for layouts. You can use them as decorative, put a picture on them, or even as a place for journaling. I covered mine with a piece of paper (Memory Box). I stamped and embossed the Adore Peony Stamp onto my tag and then colored in the Peonies with my Copic Atyou-Spica glitter pens. These are the most fabulous glitter pens ever. They have little specks of glass in them and they shimmer so pretty! I used the Tim Holtz Alteration Die, Heart Wings, for my heart embellishment. I covered Grungepaper with pattern paper and cut out the heart, the other pieces I used Paint Dabbers to color. I attached some frilly ribbon using my Tiny Attacher and I have my embellishment.
The title "love" is something I drew onto a piece of pattern paper. I used the heart from the di-cut as a stencil for my "o".
Now... Here is where the magic starts! I made this flower! Can you believe it! Nope, me either...lol! It is so easy to do and to be able to coordinate specifically to your layout gives you so many options! (Read further for more info on this cool new tool! )
I ripped up some paper and inked it to use as my journaling block. I attached it to my layout with the Tiny Attacher.
McGill Paper Blossoms:
Here is the basic tool set you will have to have: the craft moulding mat and the paper tool kit. There are a variety of punches that they have created to go with this system as well. I used them for my flower on this layout but you can also use any type of flower punch, die, or cartridge that you might have already:
Here is a quick tutorial on the basic concept of this tool. I am using a flower that I cut out with the Mother's Day Bouquet cartridge. I have also used my Tim Holtz Alterations flower die and my Silhouette too.
Draw a dot in the middle of your flower.
Cut up the flower to get individual petals. Cutting each time to the dot that you drew. This part of the petal does not have to be pretty because it will be hidden as you assemble your flower.
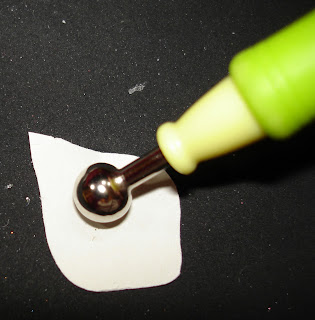
Using the stylus you just go in circular motions around each petal and it will start to curl up! (MAGIC!)
Here are some curled up petals:
You then can add creases with tweezers and roll the outer edge of the petals. I like using the end of the Imaginisce Petal Roller tool for that part.
Hope you have been inspired and I hope you look into the Paper Blossoms system too! Just think of the possibilites! Until next time... Happy Creating!


Thanks for the great tutorial!
ReplyDeleteGreat flower, but LOVE that TAG!!!
ReplyDeleteI love making flowers. Great TUT. Just became a follower....check out my blog at: http://lifeatwalnuthill.blogspot.com
ReplyDeleteEllenM361@gmail.com
http://lifeatwalnuthill.blogspot.com/
Love what you did with the Memory Box Adore stamp! Thanks for sharing!
ReplyDeleteOh, I have always wondered how to do this!! Thanks a bunchly!!
ReplyDelete