Thursday, January 27, 2011

The Making of the Birthday Journal...& a GIVEAWAY!

Good Morning. Today I am going to share some tips & tricks on how I made my birthday journal that was featured on my blog this past weekend. (Go here to see the original post.)

Here is the blank album pages that I started with....

....and here is the paper lines that I used: (Stay tuned for your chance to win!) 

 I really love this stuff! It is Claudine Hellmuth Studio Line: Multi-Medium Matte.
I, unfortunately was out of this when I did my album so I used Mod Podge. I have some now though! (in fact.. I have two jars! My local scrapbook store ordered it for me and I stocked up! lol...) The Multi-Medium is such a fabulous product. Here are some of the great qualities of this product, (from Ranger's Website...)
• Acid free, non-toxic
• Archival
• Matte and Gloss finishes
• Non-yellowing, dries clear
• Use for gluing, transfers, sealing and more
• Use for decoupage techniques
• Available in 4 oz. jars and ½ oz. bottles


 Now for the directions.
My album was really easy to make. I started by painting each page front and back using Claudine Hellmuth Studio Paint, Sable Brown. I then cut down my paper to 5.5" x 5.5", used a Corner Chomper to chomp the corners and then inked all my edges.
Here is a wonderful, fabulous tip:
The following works for any type of wet glue:
*To help prevent air bubbles you want to spread a thick coat of Multi-Medium on your surface. Make sure you cover the entire surface and that there are no uncovered places. Uncovered places=air bubbles!
*Then lay your paper down onto the wet Multi-Medium. Don't press down, but take your brush and apply the Multi-Medium to the top of the paper. START IN THE MIDDLE & WORK YOUR WAY OUT. This will work out any air bubbles! If you do get an air bubble, you can use your finger to help work the bubble to the edge to get it out. The important thing is you want to do this while the Multi-Medium is still wet.
Once I had all my pages covered, I just went back and decorated! For the above page I took a tag and covered it with my paper and inked it up. I then added some ribbon and a flower that I cut using Tim Holtz Alteration Die: Tattered Florals. My flower is made of Grunge Paper that is covered with Sticky Back Canvas. I punched holes in the top of the tag and tied ribbon all the way across.

For this page I die cut candles from a Quickutz die. I filled in the center of the candles with Stickles! In cutting down my paper at the beginning, I had a lot of little strips left over. I used them all throughout my book. Here I inked the edges and just layered them.

A lot of people asked about these cute little paper bags. They are made by Canvas Corp. The package says Canvas Home Basics and they are called Mini Bags. I stamped on one and the other I used my Texture Boutique and embossed the cupcake.

This page had to be special! It's my birthday page. I stamped a background stamp first. Then I went in and stamped my flower, but I used a paint dabber. I outlined the flower with Stickles. The numbers are from Tim Holtz Idea-ology line: Numerals. I used Alcohol Ink to color them.

To add a little more texture to my album, I used different materials for the pages. This page is made out of Grungepaper and sprayed with Glimmer Mist. I used an On the Edge die from Tim Holtz Alterations. Other pages are just sheets of paper from the paper pack that I used.

It is amazing how great something can look and when you break it down it really just comes down to cutting & pasting. Don't ever let a project intimidate you. Look at it and start breaking it apart and you will see how easy it is to create!

 NOW FOR THE GIVEAWAY!!!
To win the following you just need to become a follower of my blog and leave a comment letting me know you're a new follower. If you already follow my blog then leave a comment stating that... and I really would love to hear what you think about my directions to my book... were they helpful or could I do something to improve? I will pick a winner Sunday and announce the winner Monday! So spread the word!

The Prize: 2 Brand New 6x6 Paper Pads from My Mind's Eye!

Happy Creating!

Wednesday, January 26, 2011

Gesso!

Gesso is a fabulous & fun product! Traditionally it is used as a primer, but you can also use it to add texture to your projects. I first played with Gesso this past summer in a class that I took over at Big Picture Scrapbooking that was taught by Claudine Hellmuth. I learned so much and just had a blast! I have been wanting to take the techniques that I learned and apply them to a scrapbooking layout, so... the other day I did! Here is what I came up with:

I used a technique called "Gesso Etching". I started by spraying my cardstock with different colors of Glimmer Mist. I then used a putty knife, (actually the flat end of my Basic Grey Rub-On Roller), and applied the gesso across the page. Before it dried I took the end of a paint brush, (NOT the brush side), and drew my curly-q's through the Gesso.
If you look, you can see the color from behind the Gesso! I am fairly new to working with Gesso, but I have been so impressed with Claudine Hellmuth's Studio Line, and the Gesso is no exception. I found once I knew what to do with it or had some ideas that it is a breeze to work with!
I made a little journaling block, chomped the corners with my Corner Chomper and used a silver gel pen to write.

Look at the edges of my pictures... they are distressed. Well, it is because I used my new tool! The Imaginisce D-Stress Tool! It is an awesome tool. I D-Stressed all my pictures and it is just so easy to use!

For my title: I cut out my letters & shadows using my Cricut. I then ran the letters through my Texture Boutique and embossed them. Since I used Coredinations paper I was able to sand it and have a lighter gray come through!
One of my favorite "embellishments" on this page is below:
Definitions are big right now! You can find them on paper, stickers, stamps, etc.. I looked up the definition of the word Pose and wrote it directly on my layout. I used a Gray Souffle gel pen. It is almost as if it is part of the paper. The neat thing about this little trick is you can define ANY word you want! and it doesn't have to be written neat or straight! My definition serves as a compliment to my title and is a great "space filler". So play with adding definitions to your layouts, cards, or altered projects. See where it takes you! Here is my layout one more time so you can see how subtle the definition journaling is...


Hope you have a great Wednesday! I am off to create!
Christine

Monday, January 24, 2011

THANK YOU.

I am sitting here in front of the fire just overwhelmed with all of the wonderful things that you all have written on my post this past weekend. I was so honored to be apart of KinderStampO's Birthday Celebration. I had so much fun creating my project and several of you asked for directions on how to create it, so I am working on getting that together and will post later this week... keep watching... after this weekend I feel that giving away a little blog candy is in order!!!


I have several things to share today. First, I want to show a layout that I created using October Afternoon's Christmas line "Very Merry".
I used Tumbled Glass Distress Ink on my background papers. I cut out my tags to use as backing for my letters. Below is a close up of my favorite embellishment on this layout:
Using Sticky Back Canvas, I stamped my image with Black Ink. I went over the stamped swirls with Black Enamel Accent from Ranger. I used Stickles for my heart and Distress Inks to ink the canvas up. I then used my Tiny Attacher and attached the canvas to craft paper. Using Pop-Dots, I was able to create a pocket effect so my tag can slide behind it.

Next:
I am thrilled to announce that I have been given the Stylish Blogger Award! My dear friend and partner in crime, Pam has bestowed this honor on me! You can find her at Scrapbook Flair . In accepting this award I agree to share 8 facts about myself and then pass it on to 8 blogs that I think are stylish!

So here are some things about me:
1. I love color.
2. I am a positive happy person.
3. I started my blog to inspire & share my love for paper-crafting.
4. I am very blessed with a wonderful family & fabulous friends.
5. I love arts & crafts.
6. I am addicted to buying paper-crafting supplies. (It gets me in trouble!)
7. I love handwriting.
8. I could not scrap without my Distress Inks. (I have all 36 colors!)

The blogs that I want to pass this award to are:

Two Scraptastic Gals
Makin Pretty Things
Funky Cards
Fun & Mental Changes
Bug Lover Cards

Go check out these fabulous blogs!

Last:
I have started a Facebook Page. Please go check it out & "Like" it if you indeed like it! :)
Thank you!

Hope you have a wonderful, fabulous, CREATIVE week!

Saturday, January 22, 2011

KinderStampo's 34 Birthday Candles & Counting Blog Hop!

Happy Midnight! Welcome to
KinderStampO's 34 Birthday Candles & Counting Blog Hop!
There are over 40 designers that are helping KinderStampo celebrate her birthday with this fabulous blog hop! With all the fun and inspiration this weekend will surely be filled with all kinds of creative fun!

If you have been hoping along then you have just come from Cheryl Gibson's blog! You have now landed at my blog and next is Corri's Blog. If you have just stopped by to see me then you can go back to the start at KinderStampO's Blog and join in for all the fun!

I wanted to share with you my birthday theme inspired project. While talking to my friend Pam (also on the blog hop!) Inspiration struck and I decided to make a birthday journal. I am always last minute on birthdays or even behind sometimes! (I know, awful!) It's like they sneak up on me. So I created a little mini book to keep out throughout the year that has a section for each month and all those special birthdays that I do not want to forget! It will also be helpful at the beginning of each year, when I get a new calendar! I hope that you enjoy & are inspired by my project below!

Here is the front of the album. I used my Cricut and the cartridges Cindy Loo & Mother's Day Bouquet.

I created a tag to use for January's birthdays.

Every divider is decorated. Here is February's.

These were the cutest little brown paper bags. I stamped on one and the other I used my Texture Boutique and embossed the cupcake onto the bag. I then inked it up a bit!

August had to be special. It is my birthday month! I used Tim Holtz's metal Numerals and Alcohol Inks to write my birthday across the front.

I continued making August special by adding a little scallop journaling circle with the information from my birth. Awwwww..... lol!

I hope that you continue on with the hop from here. Once again, your next stop is Corri's Blog HERE. The very beginning is KinderStampo's Blog HERE. 
Let's all have a great weekend and wish KinderStampo a very happy and
very blessed birthday!

If this is your first time to my blog then WELCOME! and if you are coming back to see me, then WELCOME BACK! I hope that you all look around and let me know what you think by leaving comments & becoming followers.

Happy Crafting!

Tuesday, January 18, 2011

Dino Pails!

Good Morning! I wanted to share with you two little altered pails that I made for my cousins this past Thanksgiving. I love these little pails. I showed one back in December of one I did for Christmas. These I made using the Imaginisce Dino-Roar line. These set one the table at their places and they held a special treat for them! They are 3 years old, so Thanksgiving dinner is kind of boring after a while... so in their little pails they have a special toy! :) (a little Tow-Mater from the movie Cars!)

Did I mention they were twins? :) Oh how I love these little boys! They're as cute as can be, & smart... ok, enough doting! I put their names on each tin using little banners that I cut out & strung onto twine. I then tied each end to the handle.
The tops of the tins are adorned with paper rosettes. (love these!)

I bought the little stamps that go with this line and stamped them and cut them out to hang onto the side like little charms. This is a great way to get charms for your project without spending a lot of money! I covered the yellow dino with Glossy Accents to add a little extra stiffness and protection from tearing.

Dino Pails are great little happies to give to the cute, smart, wonderful little kids in your family!

Monday, January 17, 2011

Please Help Me Out!

Hi Everyone! I need your help! Cosmo Cricket is offering an opportunity to be featured on their blog and possibly be added as a design team member!!! This is what they are saying:

"Be nominated by your friends and family as one awesome person who would make a great addition to our design team. The top 10 people nominated will be featured here on our blog for you to vote on again. The winner of that vote will become the newest addition to our team for at least 6 months and they will also receive tons of Cosmo Cricket goodies including the new lines."

Please go here and nominate me and my blog,

(You have to scroll all the way down...)

Thank you so much!!!
Christine


Sunday, January 16, 2011

Bazzill Embossed Paper = Great Resist!

Good Evening everyone! I hope you all had a fabulous weekend. We went to visit with my husband's family and celebrate our Christmas with them. It was wonderful. I just love his Grandparents, Aunts & Uncles, and cousins. His Grandparents live in Mississippi on a lot of land and we all get together there and visit, ride four wheelers, and just have a good time! But.. I am back! ...and my head is spinning with so many ideas that I can't wait to get into my studio to create.
Here is a card that I made last week.
I used the Paper Blossoms tool on just a regular flower. I didn't cut the petals up, I just rolled the stylus on the flower causing it to roll up. The background was created using the Bazzill Embossed Paper.
It is fabulous! You can ink it or spray it and the cupcakes will resist because they are embossed! So I used Distress Inks and inked it all up! I cut out the word birthday using my Silhouette and sprayed it with Perfect Pearls Mist. After adding a few embellishments the card is complete!
Hope you all have a fabulous week and keep coming back for inspiration! Also... I almost forgot! I now have a Facebook page! Come over and "Like" me! It is Scrapbooking Technique.

Thursday, January 13, 2011

Using ATC on layouts...

Hello! I am sharing a layout that I did recently using ATC's (artist trading cards). There is so much on the market now for ATC's... Stamps, materials, like canvas, chipboard, acrylic, etc..., already cut down to the ATC size, 2.5"x3.5". People make them, trade them, collect them. I wanted to show you how you can use them on a layout. Here I am using them as a background for my title...
I have this great stamp from Stampers Anonymous, designed by Tim Holtz. I used Distress Ink, Faded Jeans, to stamp onto white paper, and then I embossed them using clear embossing powder. Using my Ink Blending Tool I then inked up my white paper using Distress Inks Wild Honey and a touch of Forest Moss. I cut my letters using my Cricut. I adhered them with glue, but then went back and used my Tiny Attacher to add staple accents to the letters. Here is a close up...

Here are some other ideas to use ATCs on your layouts...
You can make them into journaling blocks, you can make embellishments out of them, or if you have a picture that you really like, but it is not that great, then you can include it on your layout as a secondary photo/embellishment! Here are a few that I created to give you some ideas!

Wednesday, January 12, 2011

McGill Paper Blossoms: it's like magic!

Hello! Happy Snow Day! ...well week, where I am! It is not much compared to what the North is getting, but for our little area in the South, it is exciting! For three days now I have gotten to look outside and see the ground covered with snow! It's so pretty. Here I am the night it started to snow:


Being "snowed" in is great for scrapbooking. Here is a layout that I completed on my first snow day. I am using Memory Box Paper and House of Three Paper. Two of my favorite companies! I also made my flower using the new McGill Paper Blossoms tool! Let me tell you about this...WOW! It's like magic and so easy to use. You can now create custom flowers using papers that coordinate with your project!

I had a lot of fun creating this layout! What is so neat about the House of Three Paper that I used has a design embossed on it so that you can ink it, spray it, and it will resist. Fabulous paper! I used paper from Memory Box's new Valentine Delights line... (I love this company and I love their stamps. I used their new stamp Adore Peony Collage on this layout too! ) The background paper is Memory Box and then I used papers from the 6x6 paper pack they have for this line on other parts of the layout.

Here is the tag that I made to use as an embellishment. Tags are real big right now, but sometimes it can be tricky to use them once created, but they make great embellishments for layouts. You can use them as decorative, put a picture on them, or even as a place for journaling. I covered mine with a piece of paper (Memory Box). I stamped and embossed the Adore Peony Stamp onto my tag and then colored in the Peonies with my Copic Atyou-Spica glitter pens. These are the most fabulous glitter pens ever. They have little specks of glass in them and they shimmer so pretty! I used the Tim Holtz Alteration Die, Heart Wings, for my heart embellishment. I covered Grungepaper with pattern paper and cut out the heart, the other pieces I used Paint Dabbers to color. I attached some frilly ribbon using my Tiny Attacher and I have my embellishment.

The title "love" is something I drew onto a piece of pattern paper. I used the heart from the di-cut as a stencil for my "o".

Now... Here is where the magic starts! I made this flower! Can you believe it! Nope, me either...lol! It is so easy to do and to be able to coordinate specifically to your layout gives you so many options! (Read further for more info on this cool new tool! )

I ripped up some paper and inked it to use as my journaling block. I attached it to my layout with the Tiny Attacher.

Here is the basic tool set you will have to have: the craft moulding mat and the paper tool kit. There are a variety of punches that they have created to go with this system as well. I used them for my flower on this layout but you can also use any type of flower punch, die, or cartridge that you might have already:

Here is a quick tutorial on the basic concept of this tool. I am using a flower that I cut out with the Mother's Day Bouquet cartridge. I have also used my Tim Holtz Alterations flower die and my Silhouette too. 

 Draw a dot in the middle of your flower.

Cut up the flower to get individual petals. Cutting each time to the dot that you drew. This part of the petal does not have to be pretty because it will be hidden as you assemble your flower.

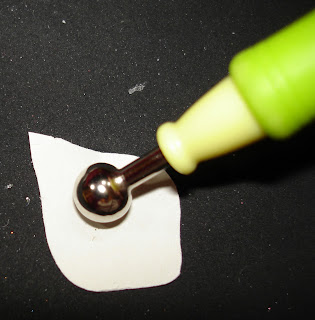
Using the stylus you just go in circular motions around each petal and it will start to curl up! (MAGIC!)

Here are some curled up petals:

You then can add creases with tweezers and roll the outer edge of the petals. I like using the end of the Imaginisce Petal Roller tool for that part.


Hope you have been inspired and I hope you look into the Paper Blossoms system too! Just think of the possibilites! Until next time... Happy Creating! 

Monday, January 3, 2011

Here's to a New Year Full of INSPIRATION!

Happy New Year!
I hope everyone had a wonderful Christmas and a very fun and Happy New Year! I am back with some organizational tips & tricks and some more Christmas presents too! I am so excited about my blog this year and the upcoming events and plans I have for it!


I thought that with it being the New Year and all the New Year's Resolutions that are being made organizing would be a good place to start for the beginning of the year.
Here is something that I recently did to help me with all my Distress Inks. I am now the proud owner of all 36 colors of Distress Inks! ...but I only own 8 Ink Blending Tools. So what I did to help me keep my Blending Foams separate is just genius! If I do say so myself!

This is what I had...

This is what I have now!
I took the organizing sheet that Ranger had on their website and printed it out on letter size paper as it was intended. I then took it and blew it up 140% onto 12" x 18" paper. I used a hot glue gun and adhered small pieces of Velcro to each square. My blending foam fits perfect and each color now has its own foam and there is no question as to what goes with what!

NOW... for some of my recent projects!

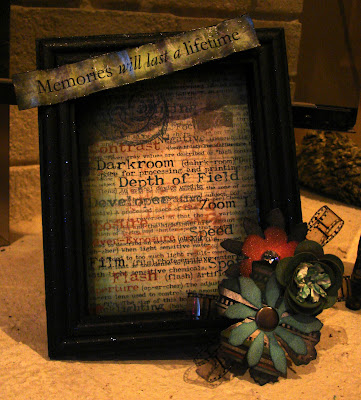
Here is a frame that I made using a paper line from Bo Bunny, Mamma-Razzi. It was a shadow box frame. I painted it and added pretty paper and embellishments. I was so so happy with the way it turned out...

Here is a close up of the flower arrangement. I used Grungepaper, paper, & Sticky Back Canvas. The rose turned out to be the coolest. I used the Rose Sizzex die and cut it out with Grungepaper and then rolled it up to make the rose! Because Grungepaper will hold its shape, you can play with it like this!

The is a cute little board I made for my Nephew, Mason. I started with a magnetic white board and covered it with this cute dinosaur line from Imaginisce. It is perfect for his room and safe because it is magnetic and a push pin board.

I was very happy with this too! It is a wall hanging I made for my sister-in-law and her family. Each board is 3.5"x3.5". I painted them with Paint Dabbers and then Mod Podged the letters on to the boards to spell out their last name.  

Last, but not least! Here is a wall hanging I made. It was for someone who loves skulls & crossbones. These came from a Grungeboard pack. I used extreme masking for the "G".

 This skull I painted with the Pearl Paint Dabber and then used Alcohol Inks to color it.

 Distress Embossing Powder met this skull... and then Distress Inks!

I painted this skull with Crackle Paint!  

Well here's to a New Year full of fun, change, & creativity. I hope to bring you lots of inspiration this year. I challenge you to step out of your comfort zone this year and try new techniques and push yourself to new creative bounds!