Tuesday, November 24, 2020

Happy Accidents

 We all know that phrase, “Happy Accident.” 

As crafters we use it often to describe a project or technique that we attempted, but, it did not go as planned. Well, today, we are going to explore what became my “happy accident.” 
This past weekend, with coffee in hand, I entered my studio, determined to learn this technique I saw online. 
I felt pretty confident. I had watched all the videos and read about the supplies used…

I got this, yes! …Ummm, No. First try I quickly realized I had to have a Dye Ink Pad. Then the second, third fourth… what am I missing!? Maybe a different paper? Nope. I am back to the drawing board on the original technique I was trying to learn, but I am here today to show you the “Happy Accident” technique that I stumbled upon.


Supplies Used: 
and all these goodies you see below: 


Are you ready to play? Let's go! 

You want to ink up your Gel Press with Dye Ink and a Brayer. Sounds simple, right? I forgot to mention, this little “happy accident” is quite simple, but yet has endless possibilities.


Now, you want to dip your paint brush into your watercolors and Splatter the Gel Press. I used Primary Elements and also just basic watercolors. I will be playing around with other mediums and encourage you do to! ...and let me know how it goes!


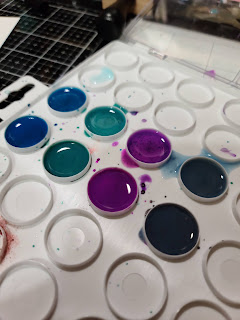
Primary Elements Colors Used: Azurite, Forest Green, Mulberry, Wintermist Grey
Before I got started I mixed the Primary Elements Pigment Powders with The Solution. I ended up also doing another row of water than I mixed the main mix in just using my paintbrush. (...I am telling you, I really was approaching this like a science experiment!)


With my paper laid down, I flipped over the Gel Press and laid it on top of my paper, and then smooshed it down


Doesn't that just look cool!? This is the point I got super excited to unveil this masterpiece I have created using this new technique! ...and this is also where I realized that it was a 
"Happy Accident."
(This is not how it was supposed to look per the technique I was trying to learn, but I love how it does look!)


Now it is time to get inky with the Distress Inks!

Ink the edges of your card. I used Weathered Wood. 


Then place a circle stencil down for your moon and ink it up! (I cut mine out with my Silhouette Cameo and stencil paper so I can use over and over again).


Using Fossilized Amber I inked in the circle to create my moon. 


Then rip up a piece of paper and lay it down as a mask and then use Distress Ink to ink up everything below that line. Here I am using Peeled Paint.


Now time to Stamp!

Using the Silhouette Style Bare Tree from Blank Page Muse, I stamped my tree. 


Here is the same technique using different colors and also adding a little more spooky to it! (I am completely afraid of spiders, so I felt very proud of myself for using this creepy guy!)


I hope you have enjoyed playing along with me today and are feeling inspired to go get inky with your Inks, Gel Press, & Blank Page Muse Stamps! It has been a pleasure sharing my "Happy Accident" with you and I am sure there will be more to come! 

Here are some fun outtakes from this creative session: 


Never be afraid of playing and trying new techniques. You never know what you're going to discover! 

Until next time... Happy Creating! 

XOXO, Christine


Click the links below for more inspiration and to connect with the Blank Page Muse Community!

The Blank Page Muse- https://blankpagemuse.com/


FB Fan Page-  https://www.facebook.com/groups/blankpagemuse/


Instagram Shop-  https://www.instagram.com/blankpagemuse/


Instagram Blog-  https://www.instagram.com/blankpagemuseblog/


Twitter-  https://twitter.com/BlankPageMuse


Pintrest- https://www.pinterest.com/blankpagemuse/boards/