Monday, February 18, 2013

When One Door Closes...

Today I have a card to share with you that I made over the weekend. It has one of my most favorite quotes in it...
"When One Door Closes, Another One Opens"
Sometimes, when going through difficult things, it is hard to see the positive. I had a friend remind me yesterday that, "You just need to keep your head up. Sometimes that is all you can do." So as one chapter comes to a close, we have to do our best to remember that the chapter may be ending, but the book is not.
 
Without further ado, here is my card:
 
I used the Korean Doors stamp from 100 Proof Press. When I saw this stamp in the catalog I had to have it! It actually is made to make the perfect tri-fold card.  
I stamped it with Versa-Mark and used Distress Embossing Powder in Walnut Stain. Then I inked the whole card with Distress Ink, Frayed Burlap. Using Distress Stain, Tarnished Brass, I inked the edges of the card. I wanted my doors to have a very distress & aged look to them.
 
Close Up:  
I used a strip of burlap, wood clock & bling from Prima Marketing, and metal embellishment from Tim Holtz Ideology. For my journaling, I used the Epiphany Shape Tool, Circle 25. I love this tool! I journaled and then used the tool to make it into an epoxy accent.
 
The inside of the card is very simple. I used another 100 Proof Press Stamp, Second Largest Squiggle. This has to be one of my favorite stamps right now! I then journaled, "another one opens."
 
I hope your week starts off fabulous. Remember to always keep your head up.
 
XOXO, Christine


Sunday, February 17, 2013

Keeping Up as Time Flies!

Wow! I cannot believe that February is halfway over! Where does the time go? Today I am going to share with you my little calendar. It is a 6 x 6 calendar from 100 Proof Press Stamps. This little guy is perfect for my bulletin board in my studio, helping me keep track of appointments & deadlines, etc...
 
The calendar comes blank and you decorate it. Though, it does already have the months and days filled in, which is great!


I used papers from Pink Paislee. The Honeycomb pattern is a stamp from 100 Proof Press. I stamped and embossed it.
 
Have a happy Sunday!
XOXO- Christine


Saturday, February 16, 2013

Paper Smooches SPARKS Challenge

Happy Saturday! Today I am playing along with The Designer Draft Challenge going on over at Paper Smooches!
 
 
The Challenge was to create a card from the following sketch:
 
Here is my card...
 
I used a stamp from the Pretty Phrases stamp set. The stamp says "Thanks ever so much", but I used a masking technique to stamp just the word "thanks" to create my background in the upper right corner. I then used the full stamp to stamp and emboss the sentiment.
I used paper from Crate Paper's Maggie Holmes line.


FUN TECHNIQUE:  
 
Using Scor Tape and Embossing Powder, I made my own Washi Tape, which matches my project perfectly.
 
I used Ranger's Adirondack Ink in Stream to stamp the word "thanks" for the background. I then used Ranger's Adirondack Embossing Powder in Stream to make matching Washi Tape.
 
DETAILS:
1. Lay out your Scor Tape, or any other 2 sided tape, on your craft mat.

2. Sprinkle with your embossing powder and knock off the extra. You can use all one color, like I did here, or play with multiple colors.

3. Heat the embossing powder til it melts. Once it cools, peel up your tape and use it like you would any Washi Tape!
 
 
Hope you all get a little time to create this weekend. I plan on spending all day tomorrow in my studio! Have a happy day,
XOXO - Christine


Monday, February 11, 2013

Fun Faux Watercolor Technique

Happy Monday! I hope you all had a fabulous weekend. Today I wanted to share a fun faux watercolor technique. Here is the card I made using this technique:
 
The Technique:
 
Gather your supplies:
Thicker cardstock or watercolor paper
Mini-Mister with Water
Distress Inks
Stamp
 
 Step One:
Lightly mist your paper with water:
 
 Step Two:
Ink your stamp with your Distress Ink. You can use one color or various colors.
 
The Distress Ink will react with the moisten paper and your image will wick out and take on a watercolor appearence.
 
Play around with this technique, try using different inks. You will find that some will work better than others. Instead of spraying your paper with water, spray it with Glimmer Mist or Perfect Pearls to create the same look but with shimmer.
 
Happy Creating!
xoxo - Christine


Saturday, February 9, 2013

From the Archives.... & a contest!

Here is a project that I posted last year around this time... but it is one that I just think is too stinkin' cute not to share with Valentine's Day around the corner!
 
These are special Valentine's Day Happies to make for all your Paper Crafting friends!


They are Distress Ink Valentines! Each one is decorated to match the color of the ink!
Example: Chip of the Old Block - Chipped Sapphire!
 
Can you guess what the others are???? Leave a comment with your guess... the first person to guess the most right wins a prize package! You have until the February 14, 2013!
GOOD LUCK!

I would love for you to become a follower and LIKE my Facebook Page too...
 
(...because of shipping costs, I can only ship prizes to the Continental United States.)


XOXO, Christine


Friday, February 8, 2013

Sweet Hearts

Happy Friday!
TGIF!!! I hope everyone has plans to make a little time for creating this weekend. I know I do!
Here is a nontraditional card that I made for the upcoming holiday. So much is pink and red and I wanted to shake it up a bit... and what better way than using Crate Paper's "Fourteen" collection and a stamp from 100 Proof Press!
 
 
I distressed and/or inked all the edges using my Prima Distress Tool and
 Black Soot Distress Ink.
Using my Fiskars Paper Crimper I crimped the "XO" strip that runs across the card.
I cut the 14 and big hearts out of the pattern papers from this line.
 
I stamped the Sweet Valentine Hearts stamp on to the same paper that I used for my background. Then using my Epiphany Crafts Shape Studio Tool Heart 25 & matching epoxy heart stickers, I created another dimension to my hearts.
 
I hope you have a fabulous Friday.
XOXO, Christine


Thursday, February 7, 2013

Be YOU - art journal entry

I have always kept a journal. It is something that I cherish. I have played on and off with art journaling through the years, but this past summer I started an art journal to document this time in my life. I am using a Simple Stories Snap Binder. You can see it HERE.
 
I want to share with you my recent entry....
 
 
When I started working on this, I was really upset. It was actually going to be a negative kind of piece, pulling the pain out of me and putting it on the paper. But that is the beauty of creating, it is so therapeutic. As I was working on it, I was calming down...
 
I started with a piece of Manila Cardstock by Ranger. Then I raided my scraps to come up with this:
 
....and then they all went into my office paper shredder! This is what I got:
 
 I then used Claudine Hellmuth's Studio Line Multi-Medium and coated my Manila Cardstock and just started throwing the shredded pieces on there. I then went over it all with the Multi-Medium.
Once it dried, I used words that I cut out of one of my favorite pieces of paper -
from the BE YOU line, "Subway Art" by Fancy Pants Designs.
 
The last step was painting the edges. I used Claudine Hellmuth's Studio Acrylic Paint in "Smidge of Blue" & "Purple Palette" mixing them up and then just quickly brushing it on lightly.
 
Always remember to BE YOU. Others might object and try to change you, but you have to be true to yourself.
 
xoxo,
Christine
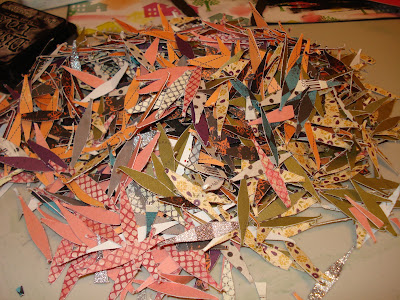
 
P.S. I still have a huge pile of shredded paper... look for it in future projects! ;)


Monday, February 4, 2013

...a little sweetness!

Happy Monday!
 
Here are some Mini Valentine's Day cards I made this past week....
 
 
I used stamps from 100 Proof Press. I had a lot of fun working on the rose card. I inked the background with Distress Inks and then stamped my Rose image with Momento Ink and colored it in with watercolor pencils. I went back and highlighted parts with Stickles.
 
The You're so Sweet card was inked, ripped, and stamped... then stapled with the Tiny Attacher.
 
There is a great Valentine's Day Themed Challenge going on over at 100 Proof Press right now... Click HERE to go check it out!
 
Here are the stamps that I used on my cards:
"You're so Sweet"
all from 100 Proof Press.